Office of Online Learning
Resources
Page Content
Canvas Faculty Docs
This is used when, in cases where a student, multiple students, or section of students, need/s a different Due date or duration of availability time to complete an Assignment or Quiz.
For login or password problems, contact the iTech Helpdesk at 601-266-HELP(4357). Press 5 for a Helpdesk Technician.
For technical issues such as browser or display problems, plugin issues, go to the 24-7 Canvas Support Hotline 1 833-668-1667. There is also an option for Live Chat through Canvas’ Help? link on the global navigation.
You may also contact the support staff at the Office of Online Learning via email at onlinelearningFREEMississippi.
To avoid copyright issues, don’t download and upload streaming videos to your Canvas course/s.
Embed instead!
Instructions for adding the Turnitin-Plagiarism-Speedgrader tool.
Full instructions for using Turnitin
Southern Miss’ Turnitin admin is Lilia Gordon (601 266-4644, turnitinadminFREEMississippi)
There are times when you are required to add extra time to an online test for a specific student. Canvas allows you to do this using the Moderate This Quiz button.
Canvas_Adding Extra Time to Test (Printable instructions)
Note: Your test must be Published to see the Moderate This Quiz button.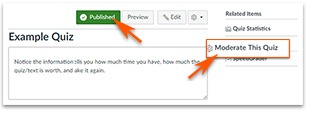
After you have created and published the quiz, you will find and click Moderate This Quiz option located on the upper-right.
In the Moderate Quiz window, you will see a list of your students.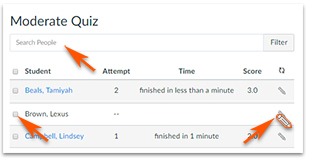
You can choose to use the search tool or scroll through the list.
Once you have found the student,
- Click the box to the left of the student’s name.
- Click the Pencil icon on the right to edit.
The Student Extension box will open after you click the pencil icon.
- Enter only the extra required minutes in the box.
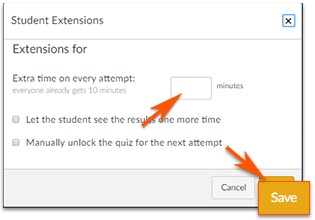
ex: the test time is 30 minutes; the student is allowed time and a half. - Enter 15 minutes in the box.
Click the Save button
The Import Course Content allows the user multiple ways of adding content. This tutorial covers copying content from one Canvas course to another.
You will start in the course that needs the content or empty course.
Printable instructions – Import Canvas Content
SETTINGS
- Click Settings
- Click Import Course Content
SELECT ONE:
- Choose Copy a Canvas Course from the list of options.
ENTER THE PAST COURSE:
- Choose from the drop down list or type in the search box for the course with the content.
- If the course has been concluded, be sure to click the box next to “Include completed courses.”
CHOOSE THE CONTENT YOU WANT TO COPY
- The easiest is to select “All Content”
- To learn more about selecting specific content, view the printable instructions Import Canvas Content.
- Click to Import
It is important to know if a student posts something inappropriate or plagiarize, the student has the power to delete his/her post and discard of the evidence. The power to edit or delete a post written by a student is the default setting.
Canvas has added a wonderful tool called the Accessibility Checker.
This tool will check all native Canvas tools you have used except the Classic Quiz and New Quiz. Besides scanning for accessibility issues, it will guide you through the process to correct the problems.
Printable version of the introduction to the Canvas Accessibility Checker.
Canvas Student Docs
Canvas uses several different types of technology to ensure a richer, more comprehensive experience for the student. Because of this, the technical requirements for Canvas may be a bit different than what instructors are used to. Specific technical requirements and issues associated with Canvas are below.
CHOOSE THE RIGHT BROWSER
Because it is built using web standards, Canvas runs on Windows, Mac, Linux, iOS,
Android, or any other device with a modern web browser. Canvas supports the last two
versions of every browser release. You can use the Canvas app for tablets and phones,
but best practice is to complete work through Canvas using a computer.
Recommended Browsers are: Google Chrome, Mozilla Firefox, and Safari (version 5 or greater).
CONFERENCES (I.E., BIG BLUE BUTTON) REQUIRES JAVA.
Java is only required for one component of Big Blue Button (Screen Sharing). This
does not require Java to be enabled on your web browser, but does require Java to
be installed on your computer. If you need help installing Java on your computer,
please view the Java Installation Guide.
As with any online learning management system, if you experience difficulty with any of the supported browsers, it is recommended that you try using an alternate browser to see if this resolves the problem.
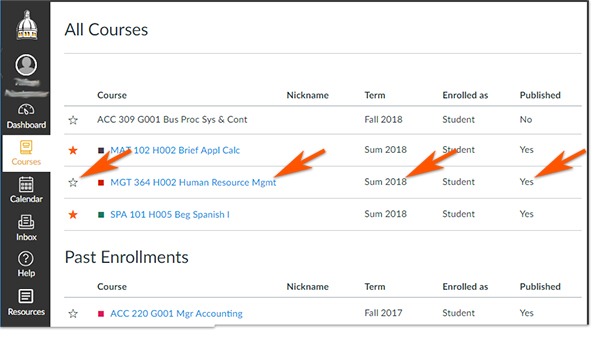
Printable instructions – Canvas_Courses_All Courses
Canvas does not immediately reflect the changes you make in your SOAR account. Wait a few hours.
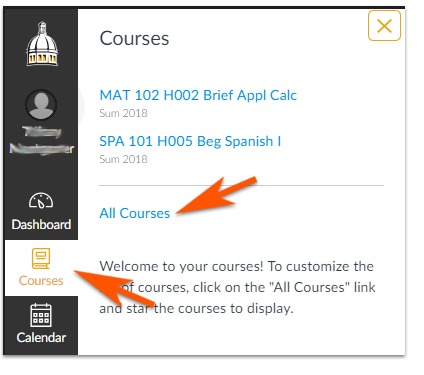
If you do not see your course/s in Canvas after waiting 24 hours, you may want to check under Courses to select All Courses.
Check the All Courses table for the name of the course, the semester, and if the course is published. If the course is published, click the Star Icon located to the left of the name of the course to give the star color. The colored star indicates the course is a favorite and will show on your Dashboard.
Canvas Studio Faculty
Office 365 Faculty Docs
Office 365 Student Docs
Students have access to the full Microsoft 365 Office Suite. For more information visit the iTech site.